So life has become extremely crazy and busy. I was sure I could do it all. With the holiday coming fast I have so many projects, and I will be having major ankle surgery in less then 3 weeks and so much to do at work to get ready to gone for 6 weeks.
I will try and get caught up on my blog and everything I can do while sitting because I won't be going anywhere for awhile.
So until then....
Enjoy this wonderful holiday season..
Sunday, December 2, 2012
Sunday, October 14, 2012
Tator tot crockpot casserole
So having such a crazy life, I thought I would try some crockpot meal ideas. So last week when my husband was out of town and I had to be everywhere at the same time I tried a few dishes. I did make chicken cordon bleu in the crockpot (recipe later), but the hit was the tator tot casserole. Since I went to work later I was able to create this before I left and the kids had a yummy dinner waiting for them, since mom and dad were both gone for the evening. I hate working nights when hubby is out of town. SO here is the yummy recipe.
Tator tot casserole:
1 regular bag of tator tots
Meat ( I used polish sausage, but any type of meat you have on hand would work)
1-2 cups of grated cheese
1 cup of milk
I used my smaller crock pot, spray the pot with oil. put a layer of tator tots, meat, and cheese. Then add another layer and put a little extra cheese, then pour a cup of milk over the stuff. Put on low for 4 hours then high for an hour (the high gets the potatoes crispy). Then enjoy.
I called the kids on my lunch and they were enjoying this nice yummy dish. It made me happy that I was able to provide a yummy meal while I was at work. I felt like supermom for a moment. They even saved me some for when I got home, and yes it was very yummy. They want this on the regular menu list.
Another hit!!!!
I will work on more recipes. Sorry there aren't any pictures because the first the kids ate it before I could get pictures, and secondly it seems to make it more of a chore to take pictures, so bear with me, pictures may come along or they may not :)
Saturday, September 29, 2012
A new Direction....
So as it seems it has been a little more then 5 months since I last posted. Things have been so crazy and busy here. I started work in March, working full time as a supervisor at OfficeMax over the printing department. Working full time, and still trying to be mom, wife and to also be creative. I am creative at work to promote different things, but by the time I get home I don't feel very creative. My husband has been sick and off work for most of the summer, but he is doing better now. And to add to all the fun now, my baby started Tackle football. My baby, if any mom has fear of watching their baby get hit and pushed by other kids, it is hard. Ok, so he isn't a baby he is almost 11, but he is my baby. Well, three nights we have practice from 5:30-7:30, along with doing things with the other 3 kids. Plus games on sat for 2-3 hours. I need a couple of extra days in the week for just ME!!! Oh, wait that won't happen. SO I am turning this blog into my outlet for creativity in my limited time. So please bear with me as I try to focus on life, my family, my kids, my husband, and my crafts. In dec. I have to have major surgery on my ankle and will put me out of comission for atleast 6 weeks, so my first goal is making meals and preparing crockpot meals for my family. I figure if I can get it going while I am walking, by the time it gets closer it will be easier to get it all ready. I hope by the end of the weeks to have a menu of recipes that my family will eat. Stay tuned as I tackle this goal.
My dear friend always calls me Mrs. Betty Crocker, I do love to make and create, but at times I feel so overwhelmed. So whenever I hear it, it makes me smile because I remember all the fun times. Don't you love it when you make an unexpected friend in a very short time, then you move away, but everytime you call, text, or facebook each other it feels like you are never apart. That is me and my friend . Never take a friendship for granted because your life can change, your future can change, but your friend will be there to laugh with you or at you if needed, cheer you, listen to your tears, listen to your joys and to just plain listen to you.
Since this is my blog, I get to say what I want. So for now, after a busy day of cleaning, sitting in the hot sun for 3 hours watching football, I will finish enjoying my day off, ok it is almost 10pm, but still I can enjoy it. Have a great night and enjoy.
Sunday, April 1, 2012
Melted Crayon Art
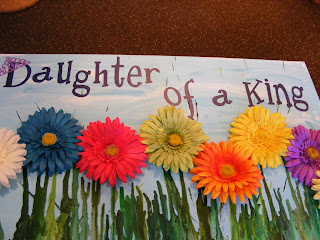
So my daughter and I have been eyeing those amazing melted crayon arts on Pintrest for the last few months and so finally we decided to do it. So we headed off to Michaels to get supplies. First on the list was crayons (or as my 16 says "crawn", I decided because she has been in Utah for most of her life and has got some of the Utah accent). While deciding on what theme to do we decided to do the YW values, and to make it like a garden. SO after getting 4 cheap boxes of "crawns" we picked the flowers. Next we picked a canvas frame that would hold all the flowers. The one we picked came with 2 so when my 11 year goes into YW in a few months we can make her one. We got home and painted the canvas, stripped the crayons of their wrappers. Our first lesson, don't use a glue gun because it just melts the crayon and not attatch it to the canvas, she put a layer of elmers glue and layed the crayons down. We broke the crayons in half to give us more but also to allow us more space. We waited until today (between conference sessions of course) and got the blow dryer out and started melting the crayons. BEWARE that this is not a clean acivity. The wax will splash so don't do it near carpet or anything that might get ruined. It comes off easily off of tile. The one tip she found out was to use a diffuser so it doesn't blow everywhere and to also do it on LOW.
After melting the crayons to the desired length attatch the flowers with a glue gun. Then add words if you want. Some of the ideas were: Daughter of a King, Garden of Values, or anything related to YW.
It turned out beatiful and she is so proud of it.


 Hope your turns out just as beatiful and amazing.
After melting the crayons to the desired length attatch the flowers with a glue gun. Then add words if you want. Some of the ideas were: Daughter of a King, Garden of Values, or anything related to YW.
It turned out beatiful and she is so proud of it.


Tuesday, February 28, 2012
Megan's 18th birthday Memory quilt
When our oldest turned 18 I made her this memory quilt.
 This is a quilt with lots of memory in the making of it. I finished the sewing right before I had shoulder surgery and then I actually quilted it a week after surgery, while one arm was still in a sling. I was glad to get it done in time. The squares were scrapbook pages I had made, so I made her an album to put the pictures in. She has loved it very much and it has been well used and washed.
Here are some more pictures of the quilt and book.


Here are some more pictures of the quilt and book.


I have created several other memory quilts for friends and family. Here are a couple of them.


Megan is turning 20 here in a few days and getting married in October. So I guess another memory quilt is in order.
Thursday, February 23, 2012
Feb. reading reward for my primary kids…
The saddest thing happened this month…..I got released from my calling as a primary teacher and put in as the Enrichment committee chair. But I promised my kids I would keep bringing in their rewards if they read each month. When a 9 year old is reading the BOM I couldn’t take away the rewards because they are so excited to be reading. So here is February's reward.


Here is the download feb, reward
Here is the download for March Reading Calender
I purchased the pencil at Deseret Book, (because that is all we have here in New Mexico) and I got the small packs of gum at the dollar store.


Here is the download feb, reward
Here is the download for March Reading Calender
I purchased the pencil at Deseret Book, (because that is all we have here in New Mexico) and I got the small packs of gum at the dollar store.
Tuesday, February 21, 2012
Door Headboard
So after being married for 18 years I have never had a headboard until today…… While scouring Pintrest I saw this amazing idea to make a headboard from a door. I wanted a door that was new because I wanted it to be mostly symmetrical, so I visited Home depot and Lowes and found a door at Home Depot. They had to order it but it cost me $44, it is lightweight and easy to move. So I bought the door and it has sat in my garage for a few months until I had more money to splurge on the crown molding and paint. Went to HD and got the crown molding and a board for the top of the door. Then went to walmart and picked up the spray paint, wall patch ( I’ll explain later) and silicone and liquid nail. Total for the other supplies about $50.
Put the flat board on top of the door and measure to the end, cut and secure with liquid nail. I added a few nails on the top to secure it, I used panelboard nails because they go flush with the wood. Next I measured the crown molding. Now crown molding is a personal desire, there are many different styles to choose from, I got a piece that was 8 ft for $17. I loved it because it had some cool textures on it.


Put the liquid nail on the two points that will be touching the board. I also used some nails to secure it. I taped the pieces together until it dried.


Next comes the wall patch. If you notice at the end of each side there is a whole from the crown molding. I took the patch and cut it so it would fit over the hole. I used two pieces. Follow the directions and then follow with with some spackling to finish it off sand when it is dry. Next use the silicone and fill the edges where the crown molding meets the door and then on top where it meets the top board.

Before you paint, fill in the nail holes if wanted and sand down very well.


After everything has had time to set ( which was the hardest part for me and of course the wind delayed my next step)
Take the board outside, lay down a plastic sheet.

Next step is the fun step….spray painting

I used this paint because it had a primer and paint in one and cost under $6 at walmart.


I used 2 cans because I wanted a good coat, make sure you dust the door off from all dust before you spray.
After painting, let it dry for a few hours.
Next comes the hard step. You need some 2X4’s to support the frame. Because mine is a King size bed, I secured 3 pieces on the wood. I wanted the frame about 21” off the floor, the holes to secure it are about 5 3/4 “ and 8 1/4” from the floor. I secured the pieces on the back of the board, then secure it to the bed. Each bed frame is different so measure and check out your own bed frame. I haven’t secured it to the bed yet, but I put some extra 2X4’s behind it to make sure it doesn’t bang against the wall. A great tip on getting extra wood go to HD or Lowes (I go to Lowes) and get scraps for cheap (50 cents a piece and they are about 4 ft long)
Next step is to install and sit back and enjoy your beautiful artwork, because that is what it is.
SO after 18 years I feel so excited to have a beautiful headboard to lean against.


Subscribe to:
Posts (Atom)